
Installing Node-Locked
SilverCreek on Windows (FortLM)
Download the SilverCreek software distribution
Go to https://download.iwl.com
Enter your username and password.
Click the “SilverCreek Updates” category.
Download the sc-mx.x-windows.exe package

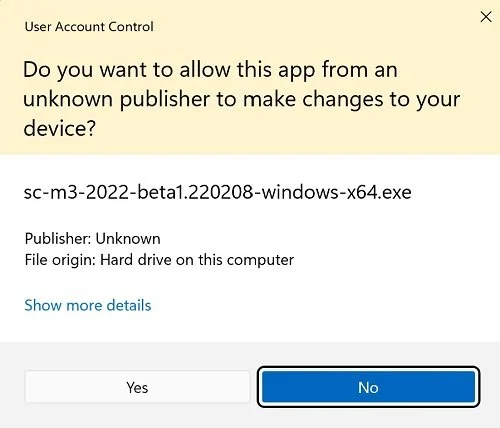
If you see a message like the one below, please click on “Yes”.
Run the self-extractable installation binary
Click the self-executable installer to begin the installation process.
A setup wizard will guide you through the rest of the installation process.
Start the application to get the HostID
To start SilverCreek:
To start SilverCreek:
Select “Start -> All Programs -> SilverCreek Mx -> Run Test Suites and Tools”
Select “Start -> All Programs -> SilverCreek Mx -> Run Tools Only” (to run Tools Only, no test suites)
Upon SilverCreek startup, you will be given a hostID in the “License File Required” window.
You can also get hostID by executing the command flmid found in SilverCreek’s “bin” directory.
Send an email to license@iwl.com, including your Serial Number, the Host ID and the installed product (e.g., sc-m3-2013-x.x-windows.exe)
Install the new FortLM license
You will receive a new FortLM license file via email from InterWorking Labs. (Be sure to check your spam folder if you have not received it.)
Remove the old license file and save it to temporary media (e.g. cloud storage, USB memory stick)
After receiving your fortlm_license.lic file, you need to install it into SilverCreek.
The simplest way is to use the “Import” button on the “License File Required” dialog when SilverCreek starts up.
Alternatively you can take a copy of the fortlm_license.lic file and place it in the SilverCreek home directory.
This is usually “Program Files->InterWorking Labs, Inc->SilverCreek Mx”.
NOTE: You must retain the file name as fortlm_license.lic.
Congratulations!
Restart SilverCreek; you should be up and running!
If SilverCreek is not up and running, please log a ticket at https://iwl.mojohelpdesk.com